Photos are valuable reminders of our past and help us to connect with our memories. They remind us of the wonderful times and relive the feelings, stories, places, people, etc. again. In olden times, people did not have the advantage of using memory cards to store pictures digitally, which is why photo restoration was next to impossible.
Back then, they used regular old film cameras to print out the pictures after developing the film rolls. Sadly, the life span of those pictures wasn’t very long. With time, the photographs used to wear out. It is because the quality of ink and photo paper used was not as good as today. Apart from that, there were other reasons that could damage the images such as fading of ink, tearing of edges, and appearance of creases, marks, stains, etc.
Tips for photo restoration
However, now you don’t have to worry about such issues after the advent of digital technology. It has brought in many tools that can help in eliminating the blurry pictures, edit and retouch images, and restore the old photos to bring back its original form.
In this article, we’ll get an overview of what photo restoration is, its process, how to carry out the process with photo editing software, and a few tips you must stick to during restoration.
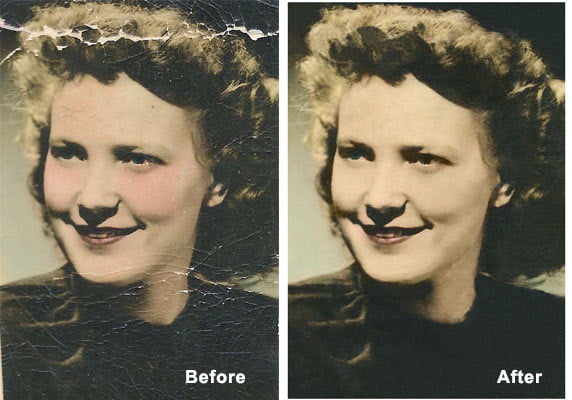
What is Photo Restoration?
You might have noticed that the photographs taken a couple of decades ago do not look as good as before. Besides, as the day passes, they tend to degrade and fade. In addition to that, external factors such as tearing, ripping, stains, water, fire, etc. can also cause damage to the printed photographs. However, these effects can now be reversed or reduced with the help of photo restoration services.
These services mostly incorporate the use of photo restoration techniques, where digital restoration tools are employed to convert the photographs into digital images. Then, professional photo editors work on it to fix the damages and improve the overall quality and appeal.
Nowadays, apart from professional designers and image editors, photo restoration has also become accessible to the general public because of the development of consumer-grade scanners and various photo editing tools like Adobe Photoshop. We are also going to discuss this later in the article.
So, with the use of the scanner and software, even a layman can try restoring the photographs and bring back to its original form. However, this does not guarantee success. The whole process is a lot more complicated, therefore it requires years of training and practice for truly mastering it. It is one of the main reasons why people opt for companies offering high-quality old photo restoration services. Now, let’s have a look at the 10-step process to carry out photo restoration with perfection.
10-Step Photo Restoration Process to perfectly Repair Old Photos
For repairing the old and distorted images, we have listed down several steps that are usually followed and recommended by the experts in the industry.
-
Scan the image
Before you start with the process of digital restoration, you need to scan the original photo or film negative. For this, you need to have good scanning equipment at your disposal. A quick tip is to use flatbed scanners instead of sheetfed scanners since they offer much higher quality. So, while setting up the scanner, try to set the dot per inch (DPI) resolution to 400-600 for photo prints and several times the aforementioned resolution for film negatives. Precision should be 16-bits per channel and 48-bits in total color depth so that the digital file can withstand more retouching. In addition to this, you can save the scanned file in TIFF file format to maximize the preservation of details.
-
Analyze the damage
Once the image is scanned, open it in the desired photo editing software to analyze the damage and devise a plan. A good rule in photo editing is to cover the overall edits first before shifting your attention to the specific areas. So, go for the overall tonal adjustments or fix up the rips, dust, or creases before you adjust the tone and contrast of the whole image.
-
Adjust the levels and curves
The level and curve adjustment tools are often provided by most of the image editing software to set the levels and contrast within the image. Droppers might be also available, which can be used to perform a quick level adjustment and bring back the tone under control. The droppers are usually available in different colors to target specific points in the image. You will start noticing an immediate improvement in the overall appearance of the picture after using it.
-
Go for the details
Once you are done with the global adjustments, you can start focusing on the specific areas. Zoom in the image and try to address any slightly visible imperfection. There might be spots, tears, irregular stains, or marking in the old pictures. For removing it, you can use the Clone Stamp and Spot Healing Brush during the process of image restoration. Besides, mold damages and darkened stains can also be restored with it. The tool usually reads the surrounding pixels and uses it to cover up or repair the damages.
-
Crop to get cleaner images
In this case, you might have to isolate a particular individual or object through photo manipulation. Techniques such as cropping and selection can be really helpful and greatly enhance the looks by isolating an object or individual from the image. These images can later be retouched to create a simplistic view. For cropping out the unwanted edges from the scanned photo, you can also try using the Marquee tool.
-
Enlarge small-sized images
When it comes to restoring the passport-sized photographs, you first need to scan and scale them so that they appear large. It will ensure that pixelation is not an issue later. With the help of digital photo restoration, you can seamlessly retain the quality of the image while enlarging it to the desired size.
-
Restore the faded images
Fading is another phenomenon that tends to occur over time. However, it is also possible to fix it with the help of various image restoration techniques. Apart from time, sunlight and dampness are other factors that can lead to fading. In that case, you can use the tinting technique to eliminate it. However, this method is somewhat tricky. So, if there is any such requirement, it is better to choose a professional company offering appropriate tinting services to carry out the task. Properly tinted snaps will reassure the rich look in an image.
-
Repair damages caused by fire and water
Ink marks, fire burns, and water-soaked images require utmost care while processing. Therefore, it is also advised to look for a professional photo restoration company for repairing it and assisting you with the task. Perfectly copied selections and careful manipulation will help to restore the damages to a greater extent.
-
Fix up the torn images
Images that are kept for decades in the glass frames can be susceptible to tears and scratches. For this, you need to pay special attention to revitalize it. These photos need to be stitched back to recreate the original picture. There will also be missing parts of the photograph, which will require further copying and editing. Therefore, you need to use the existing parts of the same picture to fill up the missing areas for giving it a clean and refurbished look.
-
Final output is ready
Once you have addressed every imperfection, you can finally admire the results and the time you have spent for carrying out the whole process. The final image will now be ready to use and will have the charm it had lost a while ago. So, don’t be afraid to try it, and you will see that with a bit of practice, you can easily achieve the desired results you want.
Now that you know the varied steps involved in photo restoration, you may want to try it out on your projects. However, to carry out the process, the first and most important thing you need to have been an image editing tool. Since we’ve already mentioned Photoshop as one of the best photo editing tools, you can use it to restore old photos to their past glory. We have covered the steps below that you should follow for efficient photo restoration in Photoshop.
3 Main Photo Restoration Tips to restore old photos
-
Follow a plan that is consistent
Before starting to work, decide how you want your image to ultimately appear. Frame a structured plan according to that and you will surely get the desired outputs. Normally professionals scan the photo, create a Photoshop file and lock the repair that may change. Cleaning is the next step in which all issues such as blemishes, marks, lint, dust and debris are removed. It is followed by the repairing phase where fixing the bent corners, covering scratches, hiding holes, repairing tears and similar issues are dealt with.
-
Clone stamp must be optimally used
Most of the old photos that reach a professional company offering image restoration services are damaged and blemished. Mastering clone stamp tool eases your process of restoring them. Great outputs can be obtained in a really shorter time period if you can use this tool effectively. You may find it hard to spot the issues in a scanned image in its actual size. So, have a magnified view for it and then the problems appear clearly to you. While using clone stamp vary the brush size so as to exactly cover the area that you want to operate on. Assure that you correctly use the matching colour, texture and tone of the source area that you would like for your target area.
-
Make the best use of Masks
If you are planning to make some adjustment to the whole photo, it can be perfectly done without any hitches. However, if adjustments are to be made only for a selected portion, other parts of the image need to be masked and blocked from the changes that you intend to make. Mask tool is the best option for you to make this happen with faultlessness. This is really a powerful feature that can help you immensely when it comes to digital photo restoration. Most of the professional companies testify the same.
Finally, we need to say that careful judgment and decision is a critical aspect of the photo restoration method. So, before you start with the process, make sure to know what you are hoping to accomplish with it.
Know whether maintaining the original form of the image is even important or not. Also, figure out the different aspects that need improvisation to the maximum. The answers to the above questions are really important if you want to get the results as per your expectations.
For example, if you are doing it just for fun or practice, then it better not to tamper with the client’s image or any photo that is valuable to you. However, if it is really important, then you can outsource the images to a reputed photo repair service provider in the industry. It will take some time and patience to research and choose a particular company for the job. However, the results will be worth the time and money spent.