Organizing a photoshoot is a really troublesome process that interior designers, furniture manufacturers, and architects commonly go through. If you are one of them, you know that you have to ensure that everything is right the very first time because it’s quite hard to re-photograph the same space. While you need to make a space ready for a photoshoot session, you should also hire a professional photo editing service to get your photos polished. Professionals who provide these services use Photoshop to clean up images before creating final image versions. In this post, we have detailed how you can use Photoshop for interior design image enhancement to clean your interior design images so that you can send them to be published in magazines or use them on your website or other portals for project demonstration.
Photoshop Tips for Editing a Living Room
-
Don’t Make Windows Appear Over-exposed
If your images have overexposed windows, the outdoor scenes do not become clearly visible. Even if you hire a professional photographer who would click different photos under different exposures, you would still need Photoshop to get your images refined and for compositing the images. Window correction is crucial and you should take it seriously.
-
Perform Television Glass Glare Removal
The overall appeal of an image gets impacted negatively if there’s a TV glare that reflects unwanted objects such as a shabby sofa. Photographers may often fail to avoid TV glare during a photo shoot, but it can be neatly removed by using Photoshop.
-
Reduce the Glare on Other Objects
Objects having dark, lustrous surfaces have glare that can destroy image appeal. You would want your images to be professionally displayed by media outlets and so you would want them to be edited professionally.
-
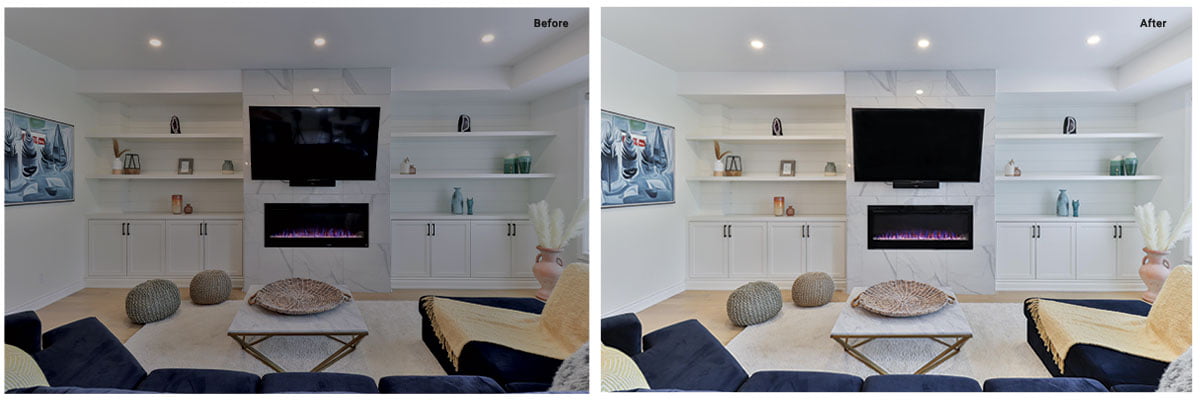
Remove Unwanted Visual Elements
Image cleaning is one of the main purposes of using professional photo editing services. You can use Photoshop to delete undesired objects such as colored lights, gadget logos, loosened wires, etc.
-
Perform Color Correction on Stained Glass Windows
Photo editors often find fixing stained glasses in Photoshop to be a time-consuming process. Stained glass colors get captured properly only if a room is short at diverse exposures. You can use Photoshop to address this issue by combining the best lit glass window with the best-lit room shot.
-
Tweak the Location of Sculptures
You have to pay attention to minute details. The minor objects including home decor items and sculptures should be placed in appropriate positions within the room. This would give the image an added appeal that would boost its overall effectiveness. By using Photoshop, you can easily tweak the position of these elements or you may even hire a professional virtual staging company that can introduce appropriate objects in the appropriate places.
-
Delete Insignificant Accessories
If, for example, an image portraying an event needs to be promoted, you should make sure that undesired accessories are left out. This would make the image appear cleaner. Through proper photo editing techniques, these details can be taken care of.
-
Delete the Half-cut Objects
During photo shoot, some objects get half-shown and they can be hidden neatly by using Photoshop’s clone stamp feature. The object can be merged with its surrounding texture and the viewers won’t even get to know that the object actually existed.
-
Review if You Need to Modify the Curtains
Are the curtains touching the floor? If so, make sure that they look aesthetically appealing. It is a tedious and time consuming process to rectify badly arranged or crumpled curtains, however can be fixed using any advanced photo editing tool.
Photoshop Tips for Editing Kitchen
-
Perform Image Cropping Again
When you are done with the final editing, you may consider cropping images to different sizes to find out which version looks the best. Through cropping you can bring the desired focus to a particular object.
-
Straightening of Hanging Objects
You should ask your photo editors to ensure that they straighten all hanging objects during the image enhancement process. It is also a good idea to pay attention to this aspect during the shooting phase itself to avoid overwork during the image post processing stage.
-
Erase the Labels
Whether you would remove the product labels or retain them would depend entirely on the preferences of your clients. However, if you need these images to be published in any other place, then you may use Photoshop to erase these labels.
-
Hide Cords and Wires
Images that feature cords and wires look dull and lack aesthetics. If during the photoshoot, you fail to remove wires and cords, get a Photoshop expert to remove all these unwanted objects from the images.
-
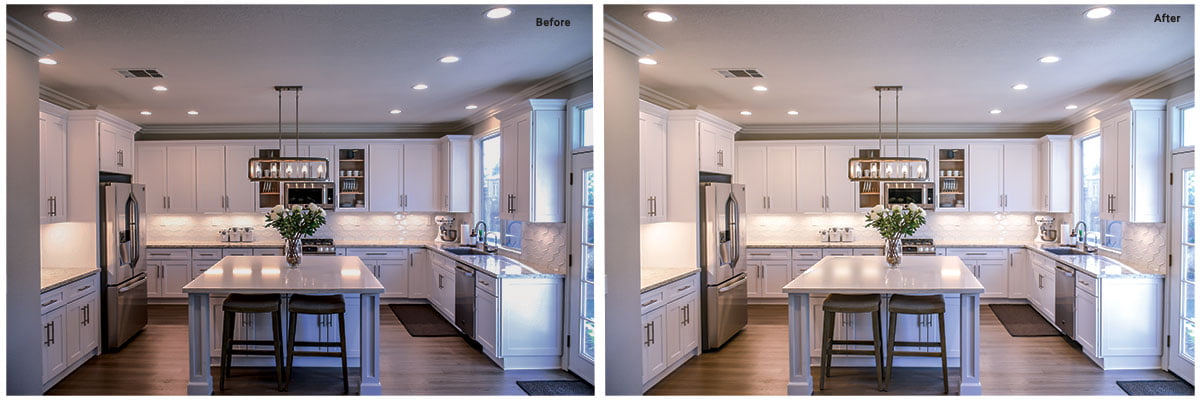
Delete Undesired Objects
You should get your images reviewed thoroughly to understand if they contain undesired objects and if they are spoiling the images’ charm. You can use Photoshop’s clone stamp and image masking tools to eliminate these objects properly.
-
Review the Cropped Image
Check the cropped image thoroughly; otherwise you may be getting unwanted areas retained, which would bring an abrupt feel to it. For example, if you have retained some portion of the ceiling lighting, then the portion that is left behind might cause a sense of distraction. Make sure that the cropped image does not contain fragments of undesired detailing that you don’t want to retain.
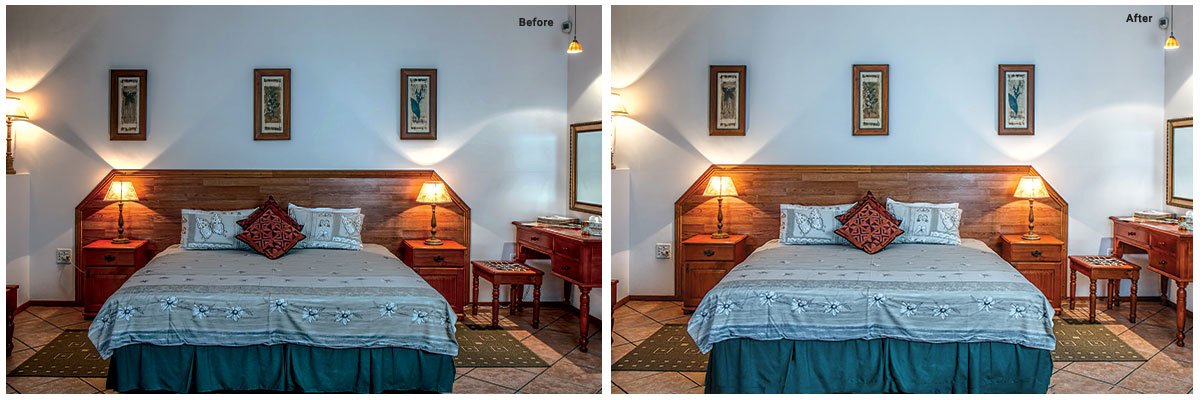
Photoshop Tips for Editing Bedrooms
-
Correct the Seam
If your image features a sliding door that got published in two halves, the seam between the sheets needs to be corrected using a photo editing program like Photoshop.
-
Delete the Mirror at the Corner
Sometimes, it may become quite difficult to remove certain objects from a scene. For example, a flower vase or a mirror at a corner of the room may get retained during a shoot and these can be removed easily using Photoshop.
-
Remove Unappealing Objects
There may be instances in which certain objects might have looked perfect as part of a bedroom during the photoshoot, but they are now looking a bit odd in images. This typically happens because of the angles in which they are shot. You may need to get virtual staging done to ensure that the right objects are placed at the right positions and angles.
-
Tweak the Color of the Bedding
You may ask your photo editors to modify the color of the bedding as per the overall appeal of an image. This would ensure that all the elements remain in perfect harmony when it comes to color combinations.
-
Eliminate the Label on Air Conditioner and the Partially-visible Sculpture
These are little things that you should pay attention to while getting your images edited. Details that don’t matter can be removed.
-
Delete External Blinds
You can consider removing the external blinds if they look too odd in the final image.
-
Consider Zooming in to Delete Objects That Are Partially Visible
Your shot may feature extra objects that are partly visible and hence, not adding any real impact on the whole image. So you may remove things such as the nightstand or a partially visible door from the image.
-
Eliminate Additional Wires and Other Objects
Make sure that your images give a perfect portrayal of your space and so you should edit the images to facilitate image decluttering.
-
Erase Outlets
Mid-wall outlets may make images appear chaotic. Therefore it is a good idea to remove them so as to instill a cleaner look.
So these were the top Photoshop tips that you can follow in your interior design projects so as to be able to create gorgeous and professional images. In case, you have a query, get in touch with us. We are the most reputed real estate photo editing company and are always ready to answer your queries and support you with simple as well as complex interior photo editing requirements.