Photoshop image retouching techniques
In the growing age of digitization, photography plays a vital role in communicating ideas and facts. Apart from being a great communication medium, it also helps in keeping your heartfelt memories alive and fresh. Nonetheless, it does take a lot of work to achieve that effect, one of which is photo retouching.
Many think that hiring a professional photographer would do the trick. However, that is just the first step. The most important thing that is needed to create a remarkable photograph is retouching. Even if the raw studio images seem completely perfect, it still needs to get edited and retouched to beautify its look. Also, images that are edited look a lot attractive than the ones that are not.
So, the first and foremost requirement to carry out the photo retouching process is your proficiency with photo editing software. In addition to that, you also need to be aware of the various photo retouching techniques to accelerate this labor-intensive job without compromising on quality.
In this article, we’ll be discussing all those tips and tricks. With the photo retouching tips mentioned here, every amateur photo editor can learn how to achieve the required effect in the image and improve its productivity. Aside from that, we’ll also discuss the various industries that commonly use and benefit from image retouching services. But, before we start, let’s discuss about photo retouching and some of its important aspects.
What is Photo Retouching?
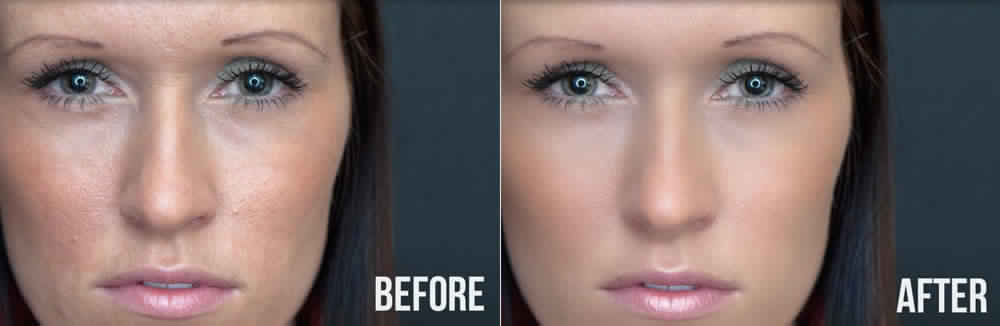
Photo retouching is the process of improving the appearance of photographs by eliminating their imperfections. The imperfections may either relate to the physical defects of the subject’s skin or unwanted objects present in the photos like dust, dirt, etc.
Sometimes, the terms editing and retouching are used interchangeably. However, both are different from one another. For example, the retouching process usually involves making small localized adjustments to the photographs. However, in photo editing, globalized adjustments like cropping, color correction, lighting/ exposure adjustment, etc. are made.
Besides, photo retouching comes in when editing is not enough to bring the desired results. It can help to add final finishing touch-ups to the photograph and improve its overall quality.
Things you need to know about Photo Retouching
Photo editing or retouching was not in great demand initially. But now, people are more knowledgeable about it. To meet their expectations, you have to keep raising your bar of standards continuously. Almost all professional photographers now realize it. So, here are some important things you need to know about photo retouching.
Industries that Need Photo Retouching Services
Photos are everywhere around us. It’s on the phone, computer, TVs, billboards, newspapers, magazines, and almost every other thing that you see. They act as a great communication medium and convey more meaning than texts. It is one of the reasons why it is commonly used by businesses in this digital world. Some of the industries where high-end photo retouching is essential are:
-
Real estate
The increasing competition in the real estate sector makes it difficult for the owners to get customers. Therefore, the most popular method implemented by them to attract potential buyers is by using aesthetically appealing images. These pictures are then presented in the property listings to grab the immediate attention of buyers and convince them to purchase the property.
-
E-commerce
e-commerce sites usually help to buy and sell products. Since it is a completely online process, images are the most crucial element in this aspect. The websites use pictures to present the detail about their products to the customers. The product photos also go through a series of image retouching and manipulation techniques so that it looks completely natural and appealing to the audience. This, in turn, helps in significantly increasing their sales.
-
Fashion
The fashion industry is all about glamour and perfection. In this case, the pictures used can be either of models or clothes and are needed to be perfect. That is why the industry relies on professional photographers or photo editing agencies to carry out their different types of photo editing styles. The most common technique that is used in the editing of fashion photographs is a clipping path.
-
Marketing & Advertising
Businesses tend to sell their products or services through marketing and advertising. For this, a variety of mediums can be used, such as posters, banners, leaflets, billboards, etc. In all these cases, images are used to grab the attention of the viewers. Therefore, this industry also relies on photo editing and retouching to increase the popularity of its brand.
-
Publishing
The publishing industry is concerned with the production and distribution of printed works like newspapers, books, or magazines. The content of those printed works not only include texts but also images. Besides, when a person is willing to purchase a book, the first thing that he notices is the picture. That is why the publications go for various types of photo editing services to get high-quality pictures to attract customers.
-
Photography & Print Studio
The photography and print studios often have the requirement of editing tons of images on a daily basis. Sometimes, the requirement might be, even more, leaving them no time to deal with all of their projects. In that case, they outsource their needs to an image editing company to help them with their tasks. Relying on it helps them to deliver their projects on time and sustain their brand image in the market.
Almost every industry that uses images for marketing and promotion employs specialized techniques for retouching photographs. This enables them to achieve high-quality images, which can boost their business. Below we have discussed some of the best photo retouching tips and techniques.
15 Photo Retouching Tips and Tricks
Every image retouching services provider strives to utilize the best strategies possible to enhance the quality of pictures to the maximum extent. If you are in this job for a long time, you might already know a few of them. However, if you are a beginner in photo retouching or editing, then learning them will be an immense help for your projects to come.
Go through each of the tips mentioned below to become a pro at your job.
-
Make a plan
Carefully analyze the picture you are going to work on. Identify its flaws and the techniques that can help to eliminate them. Create a plan and proceed accordingly to achieve the desired results. Pre-planning is very important to avoid confusion and assure precision in the final output.
-
Redefine the colors
If you wish to redefine both foreground and background colors, you can first start with defining the foreground color. Now, hold the Alt/Option to define the background color. Alternatively, you can use the eyedropper tool to select a color for the foreground and then press shortcut X to pick up the color for the background.
-
Create layers
While creating layers, avoid cloning on the base layer but try to create a copy and work on it. It can help you to mask in as well as out without any concerns. If the clone gets cluttered anyhow, then you can retry. No harm will be done to the changes you have made so far.
-
Manage folders
The content of the folders is often contracted. However, if you want to view its nested layers, you can press the Control/Command key and click on the triangle icon. Use the same method to contract the folders again. For expanding all nested folders that are present inside the folders, press the Alt/Option and Control/Command keys together.
-
Achieve distinctive paleness
You can achieve it by copying the background layer and setting its blending mode to Screen. However, keep in mind that the effects will be applied to the whole image. So, if you do not want it, then you can control it by creating a layer mask and painting the pale areas with white color and a brush tool.
-
Use zoom features
Use both zoom-in and zoom-out to assure that everything is right with the image. Doing it from time to time will help you to identify mistakes that you might have missed out. A good clone is characterized by the indistinctness of any such issues when it comes to large printing.
-
Restore the lost selection
While working on a complex selection, you might click it more than once and deselect it accidentally. However, there is a trick that can help you with restoring the lost selection. You only need to press Shift + Control/Command+ D. Now, undo it by pressing Control/Command+ Z. For performing multiple undo, press Control/Command+ Alt/Option+ Z.
-
Create non-destructive vignette
You can create a non-destructive vignette by darkening the whole picture. By using a black color brush tool, you can paint the light center inside the layer mask. However, instead of painting the area with a brush, you can use the Elliptical Marquee tool to provide a better effect.
-
Get brighter eyes
The Exposure tool can help you with making the eyes brighter. You can start by filling the layer mask with black color on a new adjustment layer. Now, paint the iris in white and pupils in black. Then, increase the exposure while setting the blending mode to Luminosity. You will see that the eyes look more attractive now.
-
Align the layer contents
You can align the contents of the layers by activating the Move tool. It can aid in aligning the content of two or more layers. It usually consists of two options for alignment, i.e., Align Top Edge and Align Vertical Center.
-
Alter the brush sizes
Start with a soft brush as hard or small brushes may leave unwanted lines when the image is zoomed. However, to avoid flaws and bring more clarity to the pictures, try different brush sizes, and see what works best for your needs.
-
Adjust the skin color
If you still cannot get the right skin color after applying various techniques, then you need to work on the hues. Invert the mask first and then use a soft brush and white color to paint over the required areas of the skin. Now, adjust the skin color by controlling the hue, saturation, and light sliders.
-
Perfect the light settings
To virtually re-position the strobe, you first need to neutralize the shot. Select the desired content and copy it to a new layer. Now, reduce the image opacity depending on the content. Use the Dodge and Burn tools to paint the required quality of light onto the new layer.
-
Use different tools
You may start with a normal clone tool first. Now, get all the basics done with a regular Aperture or Lightroom clone. Try spot healing, path tool, and content-aware fill to reach a point where you are satisfied with the results.
-
Create the right contrast and depth
To create the right contrast and depth, you can mix up the blurred and sharp versions of the photograph, which is otherwise known as the Orton effect. Here, you first need to copy the background layer and set the blending mode to Screen. Now, create a copy of the current layer once again and apply Gaussian Blur to it. Finally, change the blending mode to Multiply.
It is obvious for amateurs to have a slower photo retouching workflow as compared to professionals. But, what if we say that there’s a way to improve the speed? Keep reading to learn some of the basic rules for speeding up your retouching process.
5 Fundamental Rules to speed up your Photo Retouching Process
While there are many textbook applications and methods to enhance images for amateur purposes, the same may not satisfy if you’re on a huge paid job where a stroke of artistic restoring is required. That’s why we present to you 5 fundamental rules that are unlikely to be available in any instructive manual or PDF document. With its help, you can improve the speed of your photo retouching process. They are
-
Raw Processing
One of the fundamental rules to keep retouched images perfect is to have great RAW images. Disturbed or out-of-focus snaps will usually end in blurred images even after perfect renovation; this is something from which professional companies availing quality services stay away. Disable sharpening which raw files are exported. Leave color processing for a better level later and not during the initial stages.
-
Frequency separation is not the first step
It certainly is not the first step to image enhancing but is one of the most basic photo retouching tips. Basic steps like a combination of healing brush and clone tool will help create effects that most professional companies believe frequency separation can cause. The process of separation causes weird textures to appear basically overdoing the picture. The feature is certainly useful but not for all occasions.
-
Cent percent zoom before applying effects
Tones are evened out by zooming into an image. It helps to keep the texture and details stay in place. Rarely will you see professional image editing companies use zoom ranges above 100 to apply effects like dodge and burn. This is mainly because using these tools requires some patience. Correcting pixel by pixel is a waste in most cases because no one will look so sharply with naked eyes. “Ctrl+1” is the shortcut to zoom into an image.
-
Split frequency for tone equality
Dodge and burn tool is an absolute lifesaver but not always. Just after frequency separation, create a new layer right in between the high and low frequencies. A brush with 100 percent opacity will help you with smooth transitions from here onwards. No need to apply dodge and burn if you are a master resampler.
-
Actions and Scripts
The majority of professional companies providing photo retouching services deploy proper action and script usage to create stunning images. Creating your own style of actions and scripts for color grading is one useful feature of the panel. Just after your workflow is up and running, try to focus on the creation of manual actions and scripts. Once you are okay with the process you will notice how robust it is to enhance photos right from the retouching academy aanel.
All the rules and tips we have mentioned are super effective and will not only be suitable for business but also for your personal needs. After all, who wouldn’t want their portraits or special memories to have that charm and vibrancy they see in a magazine? So, be it for personal or commercial needs, utilize the tips to the fullest to turn a normal-looking image into something extraordinary. These will help you to quickly make the transition from an amateur to a professional.
There’s also a possibility that you will make mistakes. Read our blog on some of the common photo retouching mistakes to avoid. However, making mistakes is a part of learning. So, you shouldn’t lose hope and keep practicing to become better at your job. It will require your dedicated time, attention, and efforts. But, in case you are still facing challenges, then the ideal solution will be to look for a professional photo retouching service provider like us.
Being a reputed name in the industry, WinBizSolutionsIndia offers exceptional photo editing services and can help you with enhancing the raw images with outstanding quality. Since we have a team of expert photo editors and retouchers, we can carry out your retouching and editing tasks with ease.
We always try to bring to you the best topics for photo editing and manipulations that can be of great assistance to you. So, keep in touch with us through our articles. Besides, we’ll really appreciate your feedback for the same. If you wish to know more about our services, then kindly drop us an email or contact us on our website.


