Post-processing of photos is as important as good photography, and one can’t go without the other. Surely, photography has its reputation in the industry, but photo retouching is important to make the work look more refined and professional when it comes to the presentation part.
There is no harm in saying that post-processing plays a big part in making photography what it is today. This is why every editor, no matter if they are beginners or professionals, should know these image post-processing tips that we are about to share.
But before jumping to that, let us first understand what post-processing is.

What is Post-Processing in Photography?
Post-processing is a way to enhance the quality of an image by using various tools and options to make the captured image look beautiful and prepared for various professional uses.
The techniques include using the right filters, adjusting light and brightness, fixing contrasts, etc., at the beginning level to adjusting Exposure, fixing white balance, retouching, etc. All come under one umbrella at the pro level.
Using these techniques, one can clean up images to make them visually clearer and, in some cases, change the look and feel of a picture.
In digital photography, there are various tools available in various image editing software that give the liberty to make the image look more appealing. Whereas in print photography, various darkroom techniques are used to get the desired results.
Apart from editing the image, post-processing also includes removing unwanted things or objects from the frame to make the image look on point and away from all distractions.
Now that we understand post-processing properly, it’s time to extract the photography editing tips.
Tips on How to Post Process Photos
When it comes to digital photography, various software offers numerous options to make your image look mesmerizing. But the most famous among others are Photoshop and Lightroom.
So, we’ve combined the best options from various software, and here we are about to share the pro-image-editing tips to level up your game in photography-
-
Cropping & Image Straightening
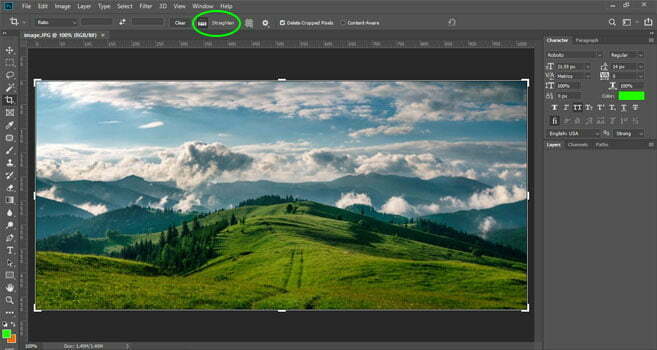
Professional photographers always try to keep their image in line and check the horizon before capturing the object/s. But, the need for cropping and straightening it comes as the first thing during the retouching process.
Many images come up with certain compositional issues and distracting objects that make the output look ugly, but cropping them and fixing them can lead to a more refined version of the images.
Talking about the Photoshop editing tips, the CROP function in it provides the photo editors a gateway to have control on maintaining the tonality of the image. It allows them to straighten the image and also helps in maintaining the right aspect ratio, along with fixing the perspective distortion.
Whereas in the Lightroom, the process of cropping includes Develop Module that is accessible by simply pressing the “R” key on your keyboard.
-
Contrast Adjustment
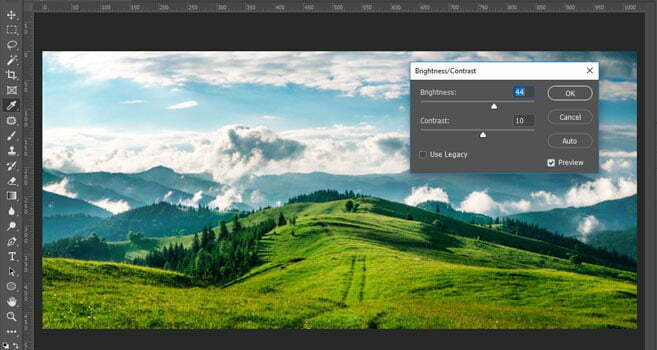
The word ‘Contrast’ explains the distinction between the two color shades, lighter and darker, present in the photo areas.
When the contrast is set to an optimum level, it reflects on the image and enhances the view. Using this technique, the images can reach the desired result by making certain areas more visible that are not properly highlighted in the lighter or darker versions of the image.
Using contrast, one can also remove the flatness from the photo. In most cases, your goal is to find the golden balance between the two extremes.
In Adobe Lightroom, the contrast can be set by moving the appropriate slider under Exposure. You have to keep the slider shift till you reach the desired balance.
In Photoshop, go to image>> Adjustments >> Brightness/Contrast. Here you will find a slider to make the contrast adjustments.
-
Default RAW Mode
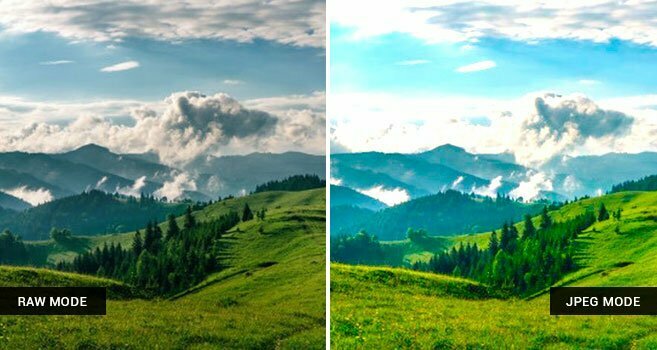
Most professional cameras and DSLRs come with JPEG mode by default, but it is always recommended to keep the RAW mode as default while capturing because it gives you more freedom to play around with your image post-processing.
This recommendation is that the RAW images preserve more details, are comparatively brighter, and have a higher dynamic range than JPEG.
Apart from the above-stated reasons, the image enhancement is more convenient using RAW mode. You can adjust the Exposure, highlights, and shadows without having artefacts or noise appear.
-
Exposure Adjustment
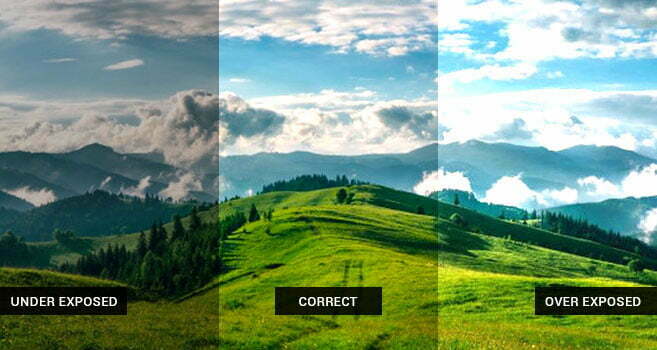
While capturing the images, the lights and weather are often not in your favour, so what to do in such a case?
You need not wait for the right situation; capture your photos and leave the rest to exposure adjustment.
All you have to do is, while post-processing, boost the contrast a bit to make it pop. Also, keep a keen eye on the unwanted highlights and shadows. Bring the sharpness and make the adjustments in the overexposed or underexposed photos.
A perfect balance of Exposure leads to a mesmerizing photo!
Using Lightroom, you can change the Exposure from the top sliders in the Develop module.
In Photoshop, choose image images>> Adjustments and Exposure to make it work for you.
-
Remove Unwanted Objects
Have you captured certain unwanted things while taking a photo? No wonder it happens to everyone every time…but the sharp minds use certain techniques to remove those uninvited objects from their images to make them look like a masterpiece.
In post-processing, one has the liberty to come over such shortcomings as the removal of random people walking, distracting objects, spots, and light flares.
Lightroom has some limitations here, as it does not provide full-fledged options like Photoshop, but its spot deletion tool can be used similarly and is more than enough for simple adjustments.
In Photoshop, a handy clone stamp and healing brush tools can make you vanish those distracting objects like waving a wand!
-
Frequency Separation for Skin Retouching
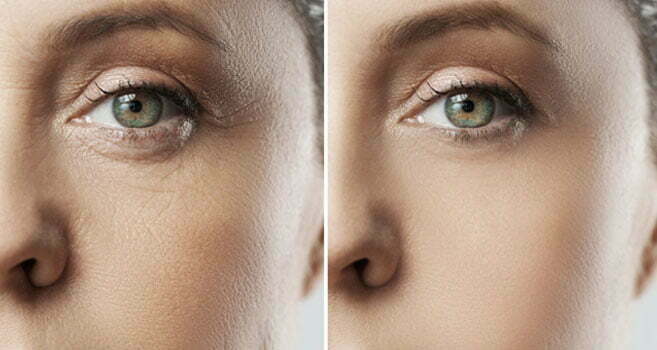
Frequency separation is considered a tried-and-true technique in Photoshop (Portrait). However, it is a complicated process that includes color separation and the application of various textures to a photo till you get a perfect and smooth eye skin retouched image.
Using skin retouching in Photoshop, many photo editors fix hair and related skin imperfections by adding texture, hues, fine-tunes, and more.
It is a layer-by-layer process that allows you to remove the unwanted things on the skin in a photo to make it look beautiful and appealing.
-
Reduce Noise
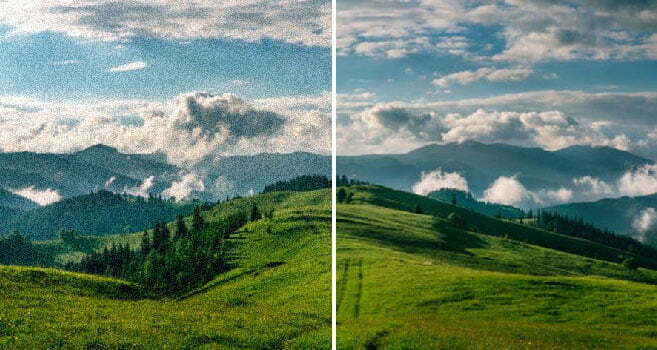
It is most common in photography that an image is viewed in 100% resolution. So, it is important to keep this factor in mind while checking for noise. Ensure that all the visible noise is fixed before presenting it to the reviewers or buyers because your image says it all.
In Photoshop, there is a direct option that leads to noise reduction, and help make things work for you.
-
Add Keywords & Metadata
Last but not least, providing apt Keywording and Meta to your post-processing images is quite helpful in making your work discoverable on the online platforms.
Especially when your images speak about a brand, product, or service, using some keyword can enhance your chance of visibility among the potential buyers.
You can preset certain keywords to apply in batches when you publish your photos. While doing so, you should keep in mind to use the finest words that are in trend and most searched.
Post-processing comes with a wider scope and is crucial for creating images that are meant to be marketable.
This is why many businesses choose to outsource their post-processing work to image editing companies.
WinBizSolutionsIndia is a professional and globally present photo editing service provider. We are a renowned company with an experience of more than a decade in the industry obtaining wonderful image editing services every day for our clients.